Flow 2 — Start Event and Track Live
What this flow covers
Section titled “What this flow covers”Follow these steps to publish and start an event, choose between demo and real game modes, and monitor teams in real time via the tracking dashboard. This flow connects the event configuration (Flow 1) to the live execution phase.
Prerequisites
Section titled “Prerequisites”- A fully configured event (see Flow 1 — Create a Complete Event)
- Teams created with route assignments
- Challenges placed on the map with GPS coordinates
- For Real Game mode: sufficient credit balance in your company account
Step-by-step
Section titled “Step-by-step”Step 1 — Navigate to the events list
Section titled “Step 1 — Navigate to the events list”Navigate to: Admin menu → Events
![]()
Find your event in the list. The Start button (green, in the Actions column) is the primary entry point. Alternatively, open the event edit page and use the Start button in the top-right action bar.
See: Event — Live Control for full reference
Step 2 — Open the Pre-Start confirmation
Section titled “Step 2 — Open the Pre-Start confirmation”Click: Start button (green) or Event Edit → action bar → Start

The pre-start page appears with two tabs: Demo and Real Game. This is the last checkpoint before the event goes live.
Step 3 — Choose Demo or Real Game mode
Section titled “Step 3 — Choose Demo or Real Game mode”Option A: Demo mode (for testing)
Section titled “Option A: Demo mode (for testing)”
- Cost: Free, unlimited
- Limit: Maximum 2 teams
- Use when: Testing event configuration before a real run
Click Start under the Demo tab. No credits are consumed.
Option B: Real Game mode (for live events)
Section titled “Option B: Real Game mode (for live events)”| Field | Description |
|---|---|
| Credit balance | Your company’s current credit count |
| Number of staff teams | Staff teams (free — do not consume credits) |
| Number of teams | Playing teams (each consumes 1 credit per device) |
| Credits remaining after | Projected balance after starting |
Click Accept sale and play to start. Credits are deducted immediately.
Step 4 — What happens when you start
Section titled “Step 4 — What happens when you start”When you click Start, MooveTeam CMS executes this sequence:
- Time window set — The start date is set to now, the end date to now + duration days (minimum 3)
- Previous data cleared — All prior results, positions, gadgets, and messages deleted
- Gadgets redistributed — Fresh gadget stock assigned to every team
- Device IDs reset — Teams must re-register via QR code
The event is now running. Teams can connect via the MooveXR app.
Step 5 — Distribute QR codes to teams
Section titled “Step 5 — Distribute QR codes to teams”Before the event begins on-site, each team needs their activation QR code.
Navigate to: Event Edit → Teams tab → QR Code sub-tab
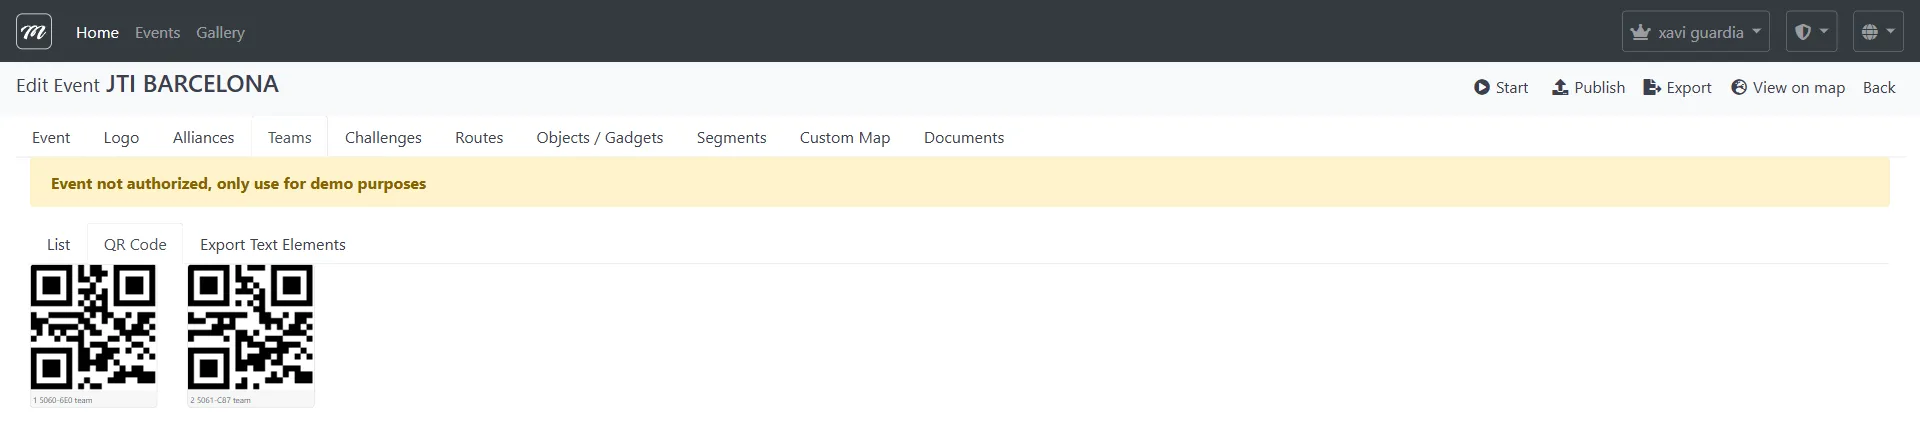
Each QR code opens the MooveXR app and loads this specific event for that team. Print them or display them on a projector for teams to scan.
See: Event — Teams for QR code and export details
Step 6 — Open the tracking dashboard
Section titled “Step 6 — Open the tracking dashboard”Navigate to: Events list → row dropdown → tracking interface
![]()
The tracker is the primary monitoring interface. It shows:
| Column | What it tells you |
|---|---|
| Category | Challenge type (Questions, Photo, Hints, etc.) |
| Name | Challenge name and point value |
| Teams pending | How many teams haven’t attempted this challenge yet |
| done / total | Completion ratio (e.g., “5 / 14” means 5 of 14 teams completed) |
Use the tabs at the top to filter:
- Word — Text-based challenges only
- Power Scoring — Manual scoring interface
- All tracker — All challenges (shown in screenshot)
Step 7 — Monitor challenge progress
Section titled “Step 7 — Monitor challenge progress”![]()
Watch the completion ratios update in real time. Key indicators:
- All “0 / N” — No teams have reached any challenges yet (event just started, teams still walking)
- Some challenges at “N / N” — All teams completed those challenges (popular/easy ones)
- Large “teams pending” numbers — Teams are stuck or haven’t reached those locations
Click the blue action buttons on each row to view individual team responses and score them manually if needed.
Step 8 — Track team positions by segment
Section titled “Step 8 — Track team positions by segment”Navigate to: Tracking → Segment tracking view
![]()
If your event uses segments (game phases), this view shows which segment each team is currently in. You can manually reassign a team to a different segment if needed — this sends a notification to the team’s mobile app.
For events without segments, this view still shows team status.
Step 9 — Use the action bar for quick operations
Section titled “Step 9 — Use the action bar for quick operations”
The action bar at the top of the Event Edit page provides shortcuts during a live event:
| Action | Use during live event |
|---|---|
| Publish | Make the event visible to players (if not already) |
| Start | Re-start (resets all data — use with caution) |
| Export | Export event configuration as XML backup |
| View on map | See all challenge locations and team positions |
Step 10 — Optionally suspend scoring
Section titled “Step 10 — Optionally suspend scoring”If you want to hide the live leaderboard for a dramatic reveal at the end:
Use the Suspend scoring action from the Live Control panel.
This toggles the ranking visibility on all public displays (Control Panel, ViewResults). Results continue to accumulate normally — they are just hidden from the audience.
To resume showing rankings, toggle the suspend action again.
Use cases:
- Building tension before a final ceremony
- Hiding partial results while judges manually score subjective challenges
What happens next
Section titled “What happens next”The event is now live and being tracked. Teams are walking, solving challenges, and accumulating points.
- For what happens during the event itself, see Flow 3 — Event Execution
- For how to end the event and extract results, see Flow 4 — Finalize and Export
Related flows
Section titled “Related flows”- Flow 1 — Create a Complete Event — The configuration that precedes this step
- Flow 3 — Event Execution — What happens during the live event
- Flow 4 — Finalize, Results, and Export — How to end the event and get data out